Overview Of This Week
This week I was introduced to the the blueprints system in the unreal engine. It was mainly the basics of how to construct a basic flow-chart-like function in order to reproduce simple results. After getting accustomed to the absolute basics, I tried pursuing more of the fundamentals of the blueprints within the UE5.
Blueprint Fundamentals
This week, I had basic goals to achieve:
- Have something that moves
- Something that changes when the player gets near
I ended up completing all these goals. I used the simple AI move to component to allow having a simple patrolling enemy AI that would move around the level. I also had a detecting pawn component that would sense when the player would come near a certain distance before pursuing the player. The code will be shown below:


There were also stretch goals to be achieved this week:
- Something that spawns other blueprints
- Something that follows the player
- Something that changes with user input
The extra tasks were all completed. Firstly, I had the main character blueprint class allow to spawn a magic spell from the player’s location to be sent out in the facing direction of the playable character which would be shot out at a set speed and disappear after a certain time. The code will be shown below:
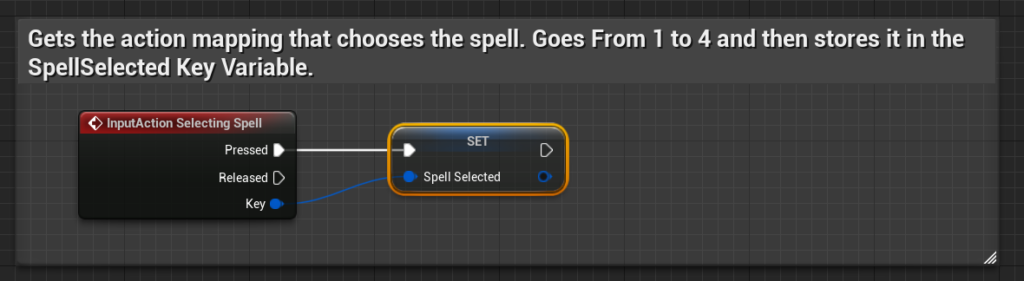
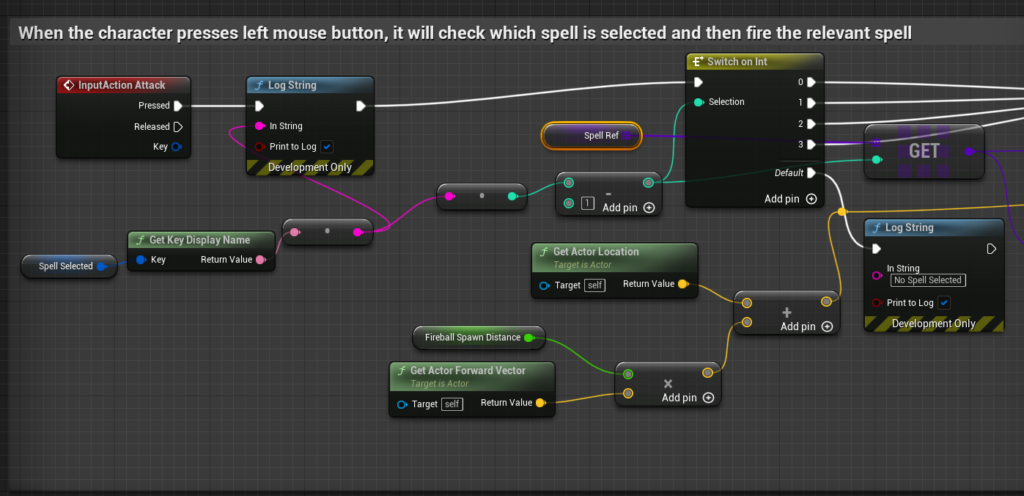
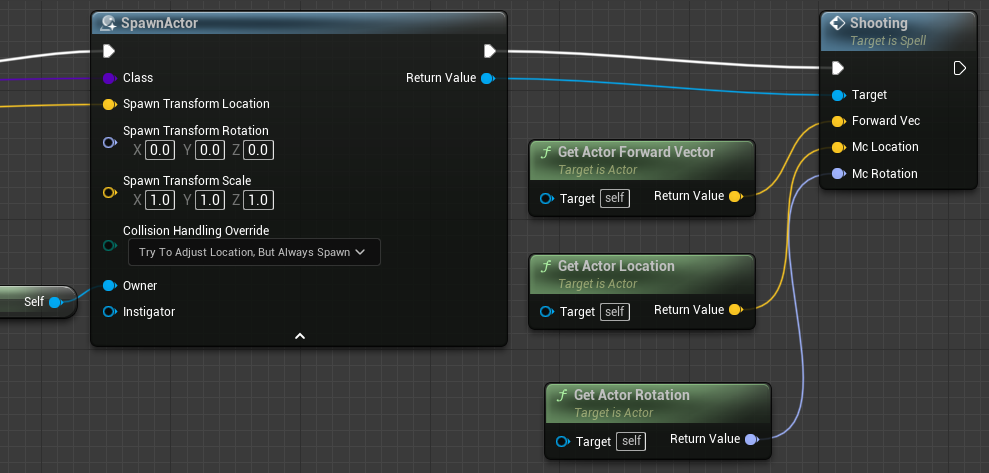
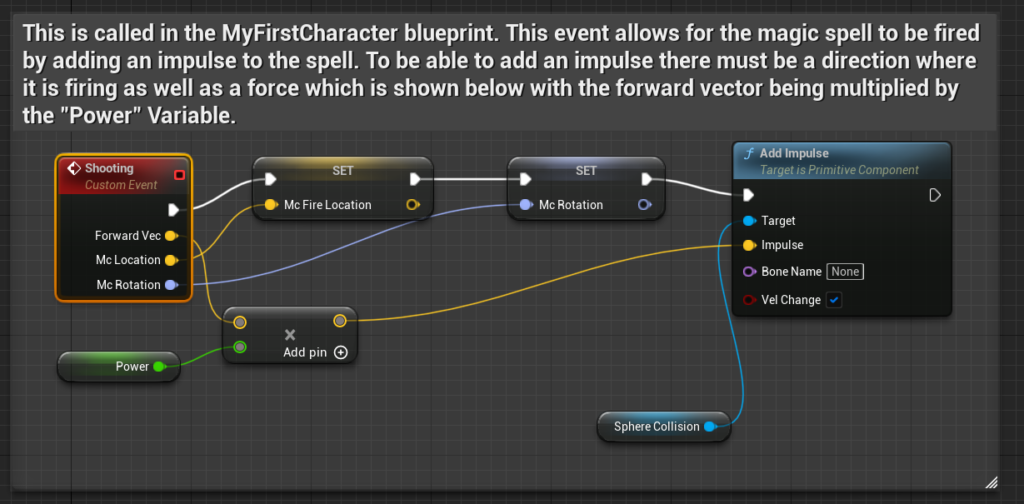
So far, there are 4 magic spells that can be shot but they do no damage to the enemy. How this works is that the player will have to select a key between 1 and 4 which will then be stored in a variable which spawns in the necessary spell blueprint with the “SpawnActor” function. The “Shooting” event will then be called with the necessary arguments inputted. The “Shooting” event will be shown below with an explanation of how it works within the image:
The second stretch goal is mostly done already with the minimum task as the enemy will change behaviour by following the player when he/she gets near to the enemy.
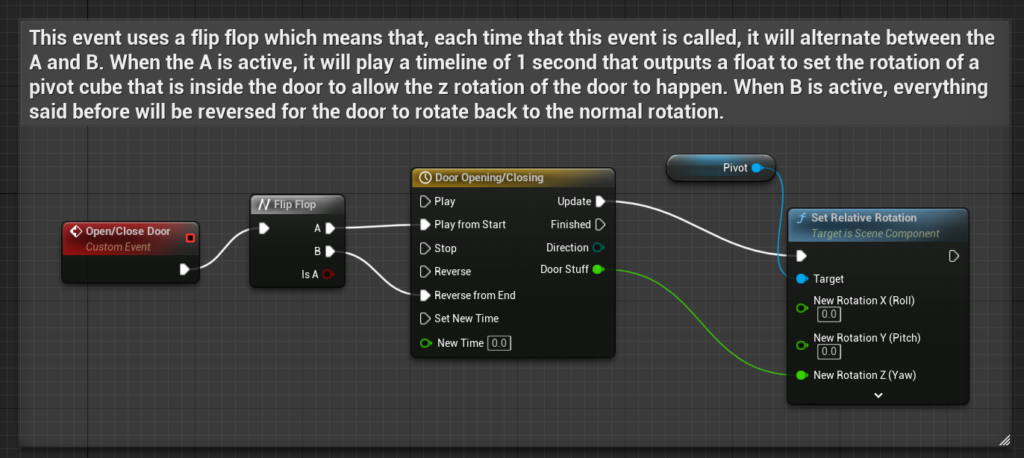
The last stretch goal is opening a door when pressing a specific input. This was completed as, when the player presses the necessary key (“E”), a ray will be shot out of the character which will hit the specified area of the door. When that happens, the door will open in a one second interval. The code for this explanation will be shown below:

Extra Things I Have Learnt Or Problems I Have Solved This Week
Unreal Blueprints
- Usually, beginners with unreal will use the default templates as a base to learn the necessary fundamentals of blueprints. But, I tried to go a bit further by using a blank template with no starter content in order to learn the process of how to truly start from scratch. From this process, I learnt much more than I would’ve if I used the other templates. This is because something like the 1st person template has certain things already put inside for the developer to make things quicker. Few such things are having a premade game mode for the developer that has all extra information already processed such as the default pawn. Another, automatically processed task was the input mappings in the project settings for the developer to use such as movement which has the WASD keys already bound.
- With the spawning of a blueprint, I made 4 possible blueprints that could be spawned each with their own power/speed
- I had a problem with the enemy pursuing the main character. The problem would be that the enemy would only pursue the player for a split second before moving randomly around the level. This is where I found out that, for the enemy to continue pursuing the player, the “AI moveto” function has to go from the “onsuccess” node rather than the general one. Even though this has a simple explanation to why and taken a bit of time to find out, this is because of the fact that the enemy must successfully reach the location before randomly moving around the level.
Plans For Next Week
- I will continue to learn the fundamentals of UE5 blueprints.
- I want to convert the blueprints that I made for spawning to have a parent with children rather than be separate entities.